
Welcome to ...


|
Demonstration Disk Guide Version 2.0
|
|
|
The Single Switch Control Interface
|
Academic Software, Inc., and its suppliers make no warranties, either express or implied, with respect to this user's guide or with respect to the software described in this user's guide, its quality, performance, merchantability, or fitness for any particular purpose. In no event will Academic Software, Inc., or its suppliers be liable for direct or indirect, incidental, or consequential damage resulting from any defect in the software, even if Academic Software, Inc., has been advised of the possibility of such damages. Some states do not allow the exclusion or limitation of implied warranties or liabilities for incidental or consequential damages, so the above limitation or exclusion may not apply to you.
This manual and software are copyrighted and may not, in part or in whole, be copied, reproduced, translated, or reduced to any electronic medium or machine readable form without prior consent in writing from Academic Software, Inc. Willful violations of the copyright law of the United States can result in civil damages of up to $50,000 in actual damages, plus criminal penalties of up to one year imprisonment and /or a $10,000 fine.
IBM is a trademark of International Business Machines, Inc. MS-DOS, Windows, and the Microsoft Hearts Network are trademarks of Microsoft, Inc. Just Grandma and Me and Living Books are trademarks of Broderbund Software, Inc., and Random House. SS-ACCESS!, KeyPics, and WinSCAN are trademarks of Academic Software, Inc.
| A portion of this material is based upon work supported by the US Department of Education under Contract Number RW-95170005. Any opinions, findings, conclusions, or recommendations expressed in this publication are those of the authors and do not necessarily reflect the views or policies of the US Department of Education. |
| Welcome to the WinSCAN Demonstration | 1.1 |
| 1.5 1.5 1.5 |
|
| Getting Started Quickly | 2.1 |
Shaded items below are other chapters in the full WinSCAN User's Guide.
Tutorial #1: Becoming Familiar with WinSCAN
Tutorial #2: Creating WinSCAN Scanning Display Setups
Tutorial #3: Using WinSCAN to Navigate Windows
WinSCAN Command and Function Reference
The Setup Window
The File Menu
The Settings Menu
The Scan Keys Menu
The DRAG Special Function Scanning Display
The TEXT WINDOW Special Function Scanning Displays
The CONTROL PANEL Special Function Scanning Display
The WinSCAN Scanning Display Window
WinSCAN Shortcut Key Quick Reference
Problem Solving and Trouble-Shooting
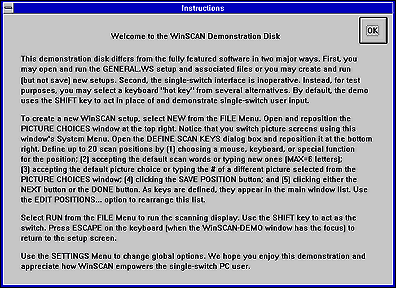
The WinSCAN demonstration program provides a Settings Menu option to select one of several "hot keys" to simulate the action of the external adaptive switch. But since practically every key or key combination on the keyboard is used for some function by some application program, using a keyboard "hot key" can not be depended upon to work the same way the external switch will in all situations. This is because the "hot key" press goes to the application program as well as to WinSCAN. For example, the WinSCAN DEMO default "hot key" is the SHIFT key. This works well enough unless you wish to enter lower case text (i.e., the application program always sees a Shift-Letter Key) or you attempt to relocate the text cursor by pointing and clicking the mouse (i.e., causing a Shift-Click selection to occur). The RIGHT MOUSE BUTTON is also a good choice for a "hot key" and avoids the SHIFT key problems. But again some programs like Microsoft Word 6.0 use the right mouse button to call up the Windows Task List. These concerns are limitations of the demonstration only. The full version of WinSCAN lets the external switch, mouse, and keyboard work simultaneously without interference.
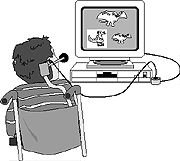
WinSCAN provides single-switch users independent control access to educational and productivity software, multimedia programs, and recreational activities that run under Windows 3.1, Windows 3.11 for Workgroups, or Windows 95 on IBM and compatible personal computers. WinSCAN creates a scanning display containing words or pictures to represent functions you need to navigate Windows and to operate specific software. The display window can scan vertically, horizontally, or by row or column. It can be repositioned easily anywhere on the PC display screen. Create custom setups for particular programs, print them, save them on disk for re-use or further editing, link them together, or use them to start your PC automatically with WinSCAN up and running.
 |
The full version of WinSCAN works with
a simple, widely used, single-switch interface cable assembly produced
by ASI called SS-ACCESS! One end of this cable plugs into
a serial port on the PC. Almost any type of external adaptive switch can
plug into a jack at the other end of the cable. When the WinSCAN
software is running, it moves a scanning selector and refreshes
the display in real time while monitoring the state of the external switch.
When you respond to the scan by pressing the switch, WinSCAN sends
the appropriate keystroke, mouse function, or command to the running application
program. You can open program groups, select icons, run applications, switch
to a new setup, point and click, cut and paste, drag and resize, use function
keys and combination key commands, enter text, and more with WinSCAN
and your single-switch!
The WinSCAN demo program simulates the switch interface using a user-selectable keyboard key (e.g., the SHIFT key) to act as the switch.
|
|
With WinSCAN and your single-switch, you can accomplish almost everything that can be done with the mouse and the keyboard ... BUT ... the keyword here is almost. There are some things that you can't do at all with WinSCAN. There are other things that you can do, but that will cause grief meaning that the scanning display may pause or become hidden in such a way that single-switch control is lost and regular mouse or keyboard input is required. For single-switch users, this may necessitate restarting the computer. Most of these potential trouble spots are rare situations and are documented at various points in the full version's User's Guide. However, a few things you should know about and avoid right from the beginning:
Barring the above problematic situations, you should have little or no difficulty installing and running the WinSCAN demonstration on your computer. This Demonstration Guide is designed to help you through (1) the software installation process and (2) the "quick start." Whether you are an expert or a beginning PC user, these sections demonstrate how WinSCAN works and what it does.
The full WinSCAN User's Guide provides a series of simple, step-by-step tutorials to help you learn how to design and use custom scanning displays for general purposes or particular applications. A command and function reference section follows the tutorials to provide detailed information about each menu option and program function. A chart of useful shortcuts is also included.
As an operating system for your PC, Windows provides a rich and powerful graphic environment for managing files, running programs, and controlling devices such as modems or printers. Typically, there are multiple ways of accomplishing most tasks. A good understanding of this operating system will help you create efficient WinSCAN scanning displays. The full WinSCAN User's Guide includes a technical discussion covering a range of topics and situations related to the interaction among Windows, WinSCAN, other application programs, and peripheral devices. In particular, this section discusses how to configure your PC to work under Windows with multiple serial devices such as a mouse, the switch interface, and a modem all at the same time.
We at Academic Software, Inc., believe that you will be pleased with WinSCAN. We look forward to receiving your order for the full version. Feel free to call for product or sales information, Monday-Friday, 9am-5pm EST, at 1-800-842-2357.
 Enjoy
WinSCAN!
For further product information, we encourage you to visit our company's web site on the Internet or to send us e-mail to asistaff@acsw.com. Our site features a FREE DOWNLOAD PAGE where we provide a WinSCAN Setup File Library with custom setups for particular games, multimedia programs, CD-ROM's, and educational software. These are setups that we design or that WinSCAN users provide for us to share with others. If you have created a particularly good WinSCAN setup for a program you use, attach the file to an e-mail to us with a brief explanation and we will post it on the Web.
Previous users will recognize that WinSCAN 2.0 retains the simplicity and ease of use that marked earlier versions, while at the same time offering a host of powerful new features that greatly enhance its utility as a complete access tool for single-switch users. Among the most important new features are:
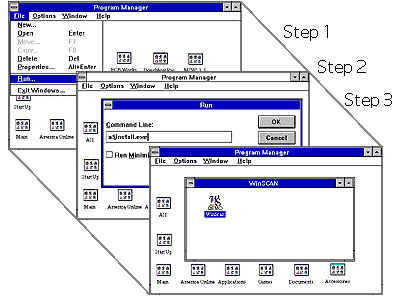
To install WinSCAN Demo, turn on your PC, run Windows, and open the Program Manager. Insert the WinSCAN demonstration disk into a 3.5" high density floppy disk drive (e.g., Drive a:). Choose the Run option from the Program Manager's File Menu. Type a:/install.exe in the command line field of the Run dialog box and click the OK button. In a few moments, the WinSCAN Demo Installer program will run. Follow the directions on the screen.
The Installer suggests a default destination disk drive (i.e., Drive c:) and subdirectory path for installing the program files (i.e., c:/wsdemo). Accept these defaults and click the OK button.. (If the demo program is installed in a different directory, the Associated Files option will not work.) The installation begins and proceeds automatically. When complete, the Installer quits and returns control to the Program Manager. The WinSCAN Demo program icon should appear on the desktop in a new program group folder named "WinSCAN." (To remove the demonstration program from your hard disk, delete the program group using the Program Manager and delete the c:/wsdemo subdirectory using the File Manager.)
This completes your software installation.
This section demonstrates one way to get started quickly with WinSCAN. You will learn how to start the setup program, open a previously prepared scanning display setup, run the program, and use WinSCAN Demo to navigate Windows. Afterwards we recommend that you explore the various menu options for creating, printing, loading, and customizing your own WinSCAN scanning displays for later use with Windows application programs.
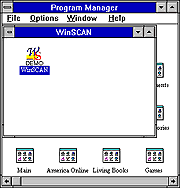
The illustration below shows the Windows Program Manager. The WinSCAN Demo program icon is in its own program group called "WinSCAN." This group window is open and the WinSCAN Demo program icon is visible on the desktop.
| Step 1: | Using the mouse, click on the WinSCAN Demo icon to select it and press ENTER on the keyboard to run the program. |
Of course, you also could double-click the icon to run the program, but the basic strategy of (1) positioning the mouse, (2) clicking to select an object or menu item, and (3) using the ENTER key to perform the object's function is an efficient way to use the WinSCAN scanning interface to navigate Windows and operate programs and games.
 |
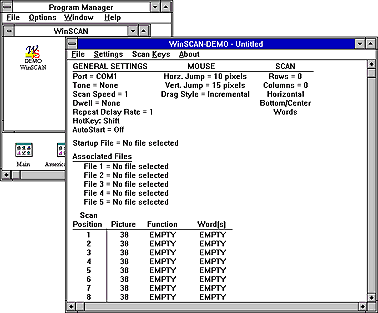
When WinSCAN starts, it displays the main Setup Window-Untitled as shown above. This is a standard window that can be resized, repositioned, minimized, covered, or closed like any other application program window. | |
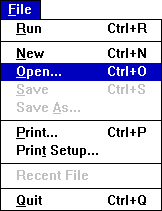
| Step 2: | Using the mouse or the Alt+F command key combination, pull down the WinSCAN File Menu. | |
| Step 3: | Choose the Open option from the File Menu by clicking on it or pressing the O key. (Ctrl+O opens the Windows File Open dialog box immediately.) | |
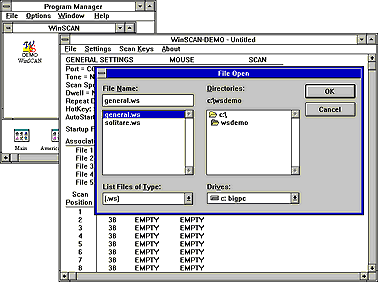
WinSCAN is shipped with one or more standard setup files for general access and for popular programs and games. You easily can create new setups for particular purposes. A WinSCAN setup filename ends in the suffix .ws. By default, the File Open dialog box shown above always displays only those files in the current directory ending in this suffix. The general.ws setup shipped with all versions of WinSCAN is designed for general purpose Windows access, navigation, and program control.
| Step 4: | Using the mouse or the TAB, ARROW, and ENTER keys, choose the file named general.ws or type the word general in the File Name field. |
| Step 5: | Click the OK button or select this control with the TAB key and press ENTER to open this WinSCAN setup and return to the Setup Window. |
 |
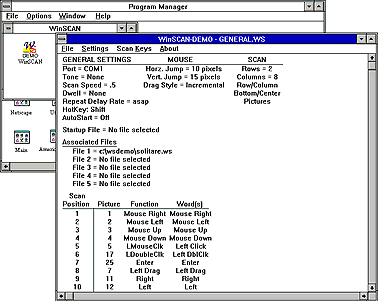
The Setup Window-GENERAL.WS shown above now displays all information about the general.ws setup. Notice 16 scan positions are defined; the scan speed is .5 second; etc. | |
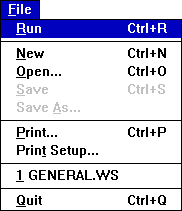
| Step 6: | Again using the mouse or Alt+F command key combination, pull down the WinSCAN File Menu. | |
| Step 7: | Choose the Run option from the File Menu by clicking on it or pressing the R key. (Ctrl+R runs the current WinSCAN setup immediately.) | |
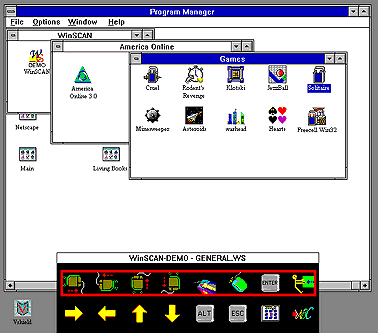
When you select Run or press Ctrl+R, the Setup Window disappears and the current WinSCAN scanning display window - e.g., for the general.ws setup that was just opened - appears centered at the bottom of the screen. The mouse cursor is positioned automatically in the center of the screen. The scan should be running at the rate of one step each half second. Your computer display may look similar to the example shown above.
You are now up and running with WinSCAN! From this point, a single-switch user has almost complete control over the computer. For example, wait until the scanning selector reaches the third scan key icon representing Mouse Up. Press and hold down the external adaptive switch. The mouse cursor should begin to move steadily up in incremental steps of 15 pixels. Release the external switch. The cursor should stop moving. The scanning selector returns to the upper left scan key and resumes scanning. Use the Control Panel scan key to adjust WinSCAN settings or switch to an associated setup (e.g., solitare.ws). Use the Text Window scan key to access a full scanning keyboard display.
Move the mouse cursor over a program group icon or a Windows (not a DOS) program icon on the desktop. Wait until the scanning selector reaches the Mouse Click scan key (in the fifth position on the top row). Press and release the external switch. The icon should change color indicating that it has been clicked on by the mouse. Now wait until the scanning selector reaches the Enter scan key. Press and release the external switch again. If the icon represents a program group, it should open on the desktop. If the icon represents a program, then that program should load and run as though it had been started by the mouse.
To quit WinSCAN, make the scanning display window active (by clicking on it with the mouse). Then press the ESCAPE key on the keyboard. The scanning display will vanish and the WinSCAN Demo Setup Window will reappear. At this point, to quit WinSCAN fully, you may:
(1) double-click the System Menu box in the Setup Window title bar or
(2) press the Ctrl+Q command key combination or
(3) select the Quit option from the File Menu
